Custom Connector

Beefree App is now RGE Studio!
The email design suite you already know and love just leveled up. We’re working hard to update our help center, but you still may see some references to the old product name.
This article applies to all plans.
Overview
RGE Studio offers many connectors for exporting your designs to external tools. See Using connectors in RGE Studio to check if your platform is included. If there isn't an integration for your platform, use the Custom connector instead. The Custom connector uses webhooks to send your design HTML to any delivery platform you choose.
You can also reference our RGE Studio Academy tutorial to learn more about this feature.
Prerequisites
Before you get started with Custom connector, make sure you have:
- A RGE Studio account
- An external application account
- A webhook URL
Note: You can get a webhook URL in one of two ways:
- Use a no-code automation tool to create one.
- Develop your own API for webhooks. This is a technical option for customers with an internal development team.
Create a webhook URL
A webhook is a key part of setting up a Custom connector. This section covers how to create one using a no-code automation tool like Zapier or Make. If you have a development team, you can also build your own webhook from scratch.
- Zapier is a popular no-code automation tool. To learn how to use Zapier to create a webhook, see Zapier's help center documentation.
- Make is another popular no-code automation tool. To learn more about using Make to create a webhook, see Make's Webhooks documentation.
- If you have a development team, you can use an in-house webhook URL from your own API. Your development team will provide the webhook URL if you choose this option. For high-level information on building a webhook, see Building a Webhooks System with Event Driven Architecture by CodeOpinion.
Whichever method you use, make sure your webhook URL returns a 200 response. RGE Studio uses this response to confirm the connection works.
Create a Custom connector
Once you have your webhook, configure your Custom connector within RGE Studio:
- Log in to RGE Studio
- Click Settings
- Click Connectors
- Navigate to Custom connector
- Click Connect
- Enter the name of your Custom connector
- Enter the Custom connector URL (the webhook URL you created in the previous section)
- Confirm whether you want to add headers with the toggle
- Click Connect to finish setting up your Custom connector
Headers
Whether you configure your Custom connector with headers is up to you. Tools like Zapier and Make manage headers for you to keep your webhook URL secure. This section explains what headers and values are. It also lists a few things to consider when deciding whether headers are right for you.
Standard headers are basic settings set up by the system sending the webhook. They help different systems understand each other. Common standard headers include:
- Content-Type: Tells the receiving system what kind of information is being sent, such as "application/json."
- User-Agent: Tells the receiving system what software sent the webhook.
- Content-Length: Shows how much data is being sent, measured in bytes, so the receiving system can prepare to handle it.
- Accept or Accept-Encoding: Tells the receiving system what response format is expected.
Understanding these standard headers helps you set up webhooks correctly.
Custom headers let you send extra key-value pairs with your webhook request. They're often used to confirm a request is genuine and to keep sensitive information, like client IDs and secret keys, out of view.
After you add a custom header, its value is stored securely and can't be edited or viewed again.
Custom headers serve a few purposes:
- Sign a request to confirm it's authentic
- Provide a credential, like an API key
- Pass along extra data that doesn't fit in the main request body
Learn more about this in Anatomy of a Webhook HTTP Request by Prismatic.
Note: You can add up to 10 headers per Custom connector.
Available webhook data
This section lists the data you can send through the webhook with your Custom connector. During setup, choose which fields to include with the HTML.
The following table lists the available webhook data.
| Available webhook connector data | Example | Description |
| Name | Thoughts | The design name within RGE Studio. This applies for emails and pages. |
| Tags | 1 | The design tags that are set up within RGE Studio. This applies for emails and pages. |
| Status (Draft, in Review, Approved) | In Review | The design status that is set up within RGE Studio. This applies for emails and pages. |
| Subject for emails, Title for pages | Email Thoughts | The email subject, or the page title within RGE Studio. |
| Preheader for emails, Meta-description for pages | Think about emails | The email preheader or the page meta-description within RGE Studio. |
| HTML | HTML code | The exported design HTML |
| JSON structure | JSON | The JSON structure of the design data. |
| Edit URL (deep link edit message) |
https://reallygoodemails.com/app/1263728/1249850/2282199/13383816/details
|
The design URL within RGE Studio |
Example: Make and Postmark
This example walks through the steps above in practice.
In this example, you'll export an RGE Studio email design to Postmark using Make. Postmark then sends the email to your recipients.
Connect Make to RGE Studio
To create a webhook in Make, follow these steps:
- Log in to Make
- Click on Scenarios
- Create a new scenario
- Add a new webhook module to the scenario
- Create a new webhook URL
- Copy the webhook address to your clipboard
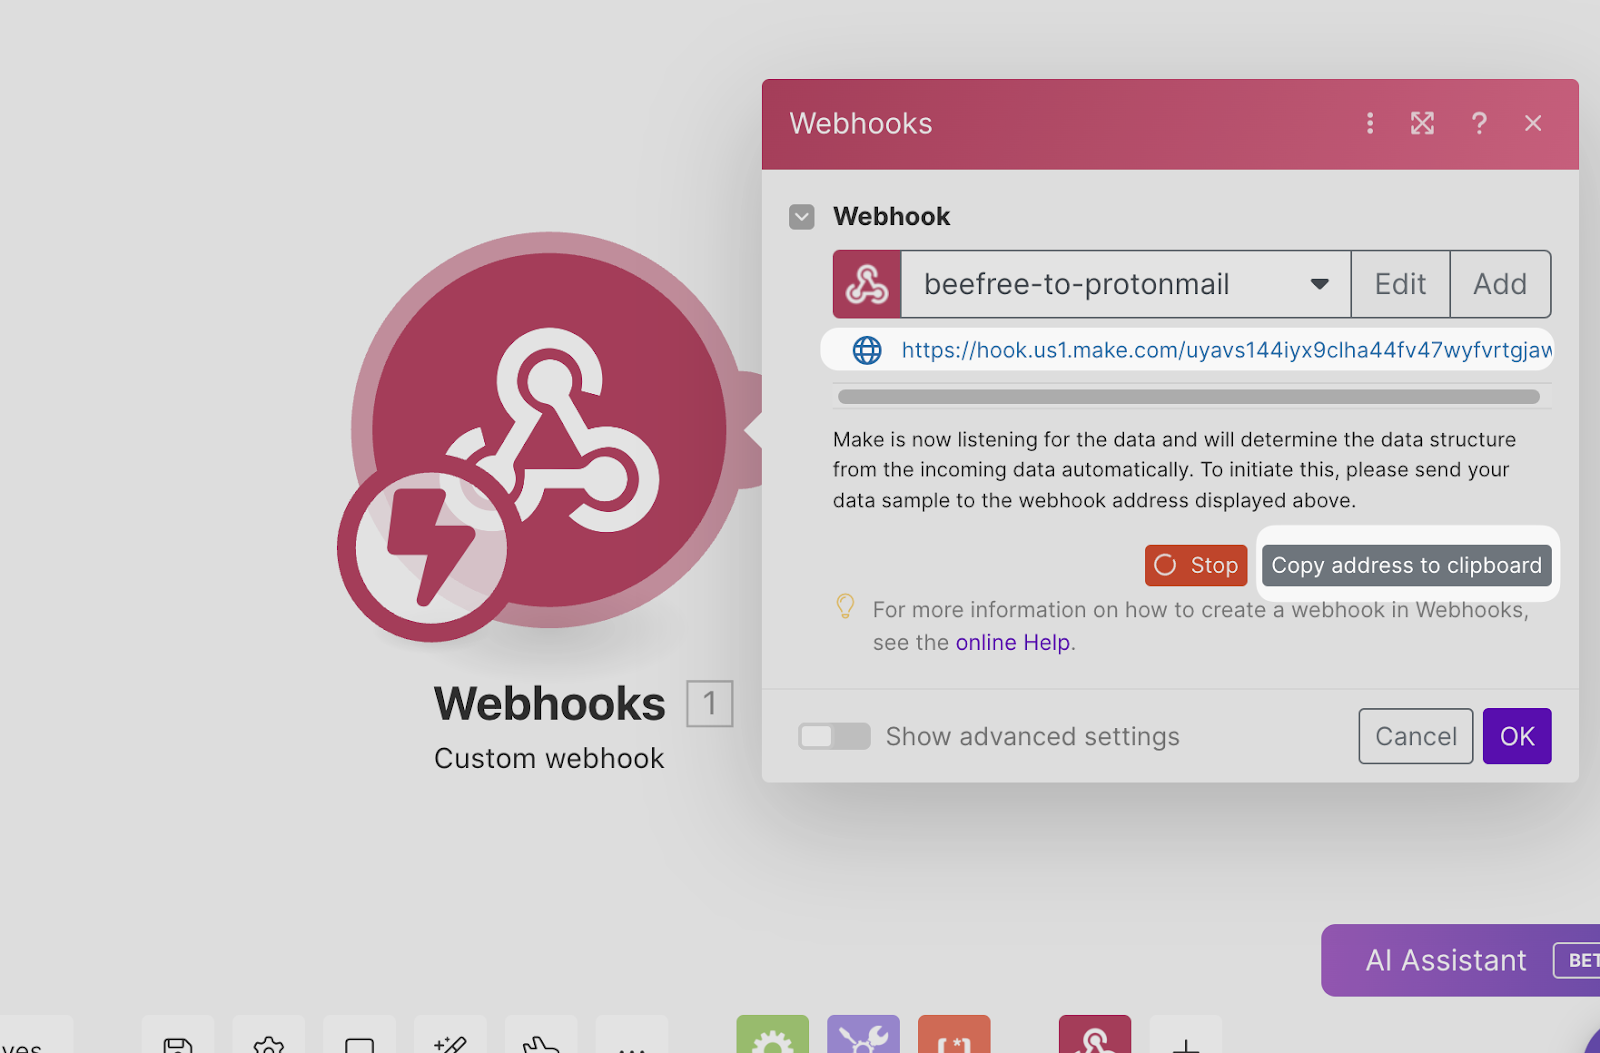
After you copy your webhook URL, navigate to the RGE Studio application.
In RGE Studio, add your Custom connector URL:
- Navigate to Settings
- Select Connectors
- Click on Custom connector
- Enter a Custom connector name
- Paste the Custom connector URL you copied in the previous section
- Click Connect
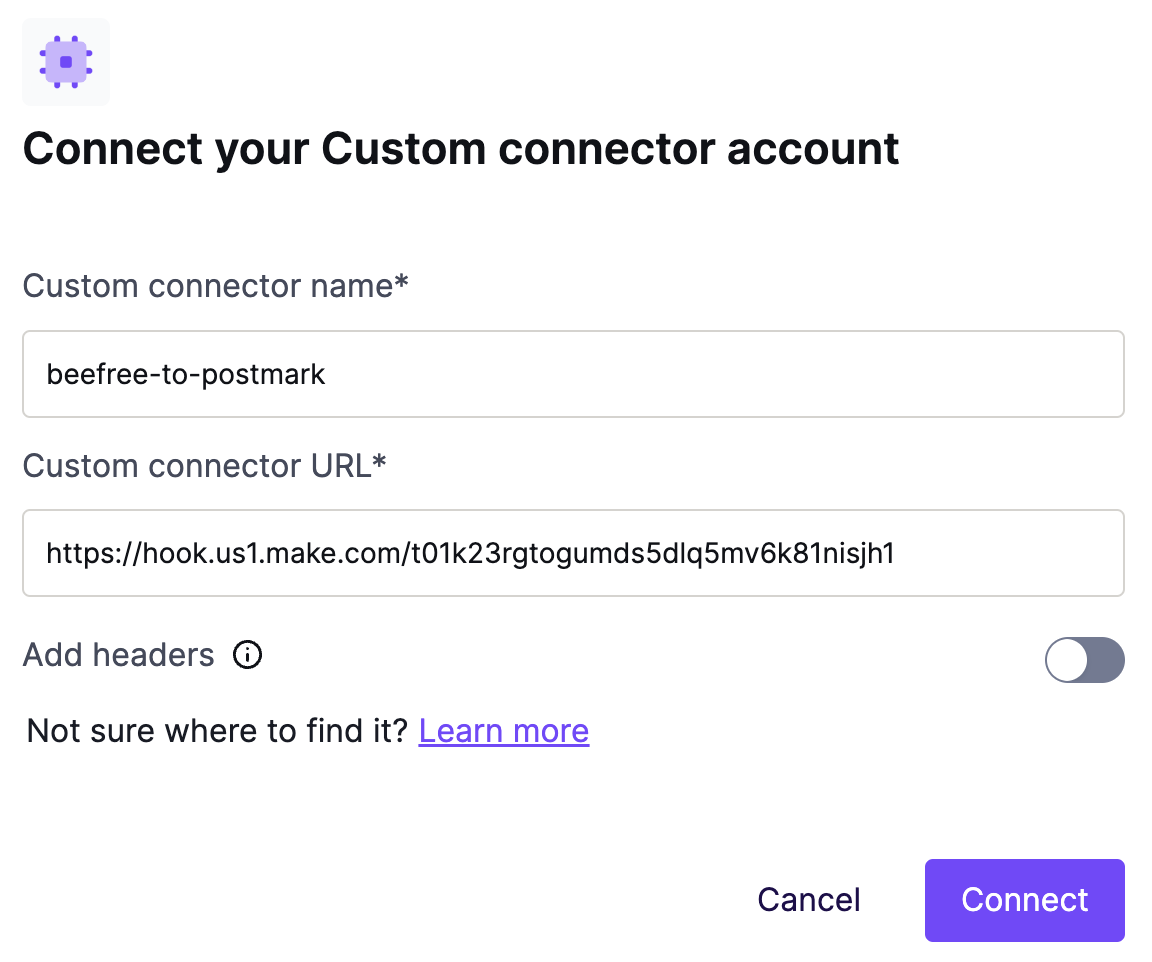
Once you click Connect, RGE Studio sends a test event to Make to confirm the connection. Make shows a confirmation message when the connection succeeds.
Connect Postmark
Next, in the same Make scenario, connect to Postmark, the sending platform for this example.
- Add Postmark as a second module that connects to the webhook
- Select Create a Draft as the action
- Select Send an Email as the action
- Connect your Postmark account to the module
- Add the subject data to the Email Subject field
- Add HTML to the HTML Body field
- Add a From email address in the From field
- Add a To email address in the To field
- Select a Postmark Message Stream
- Click OK to confirm the Postmark configuration
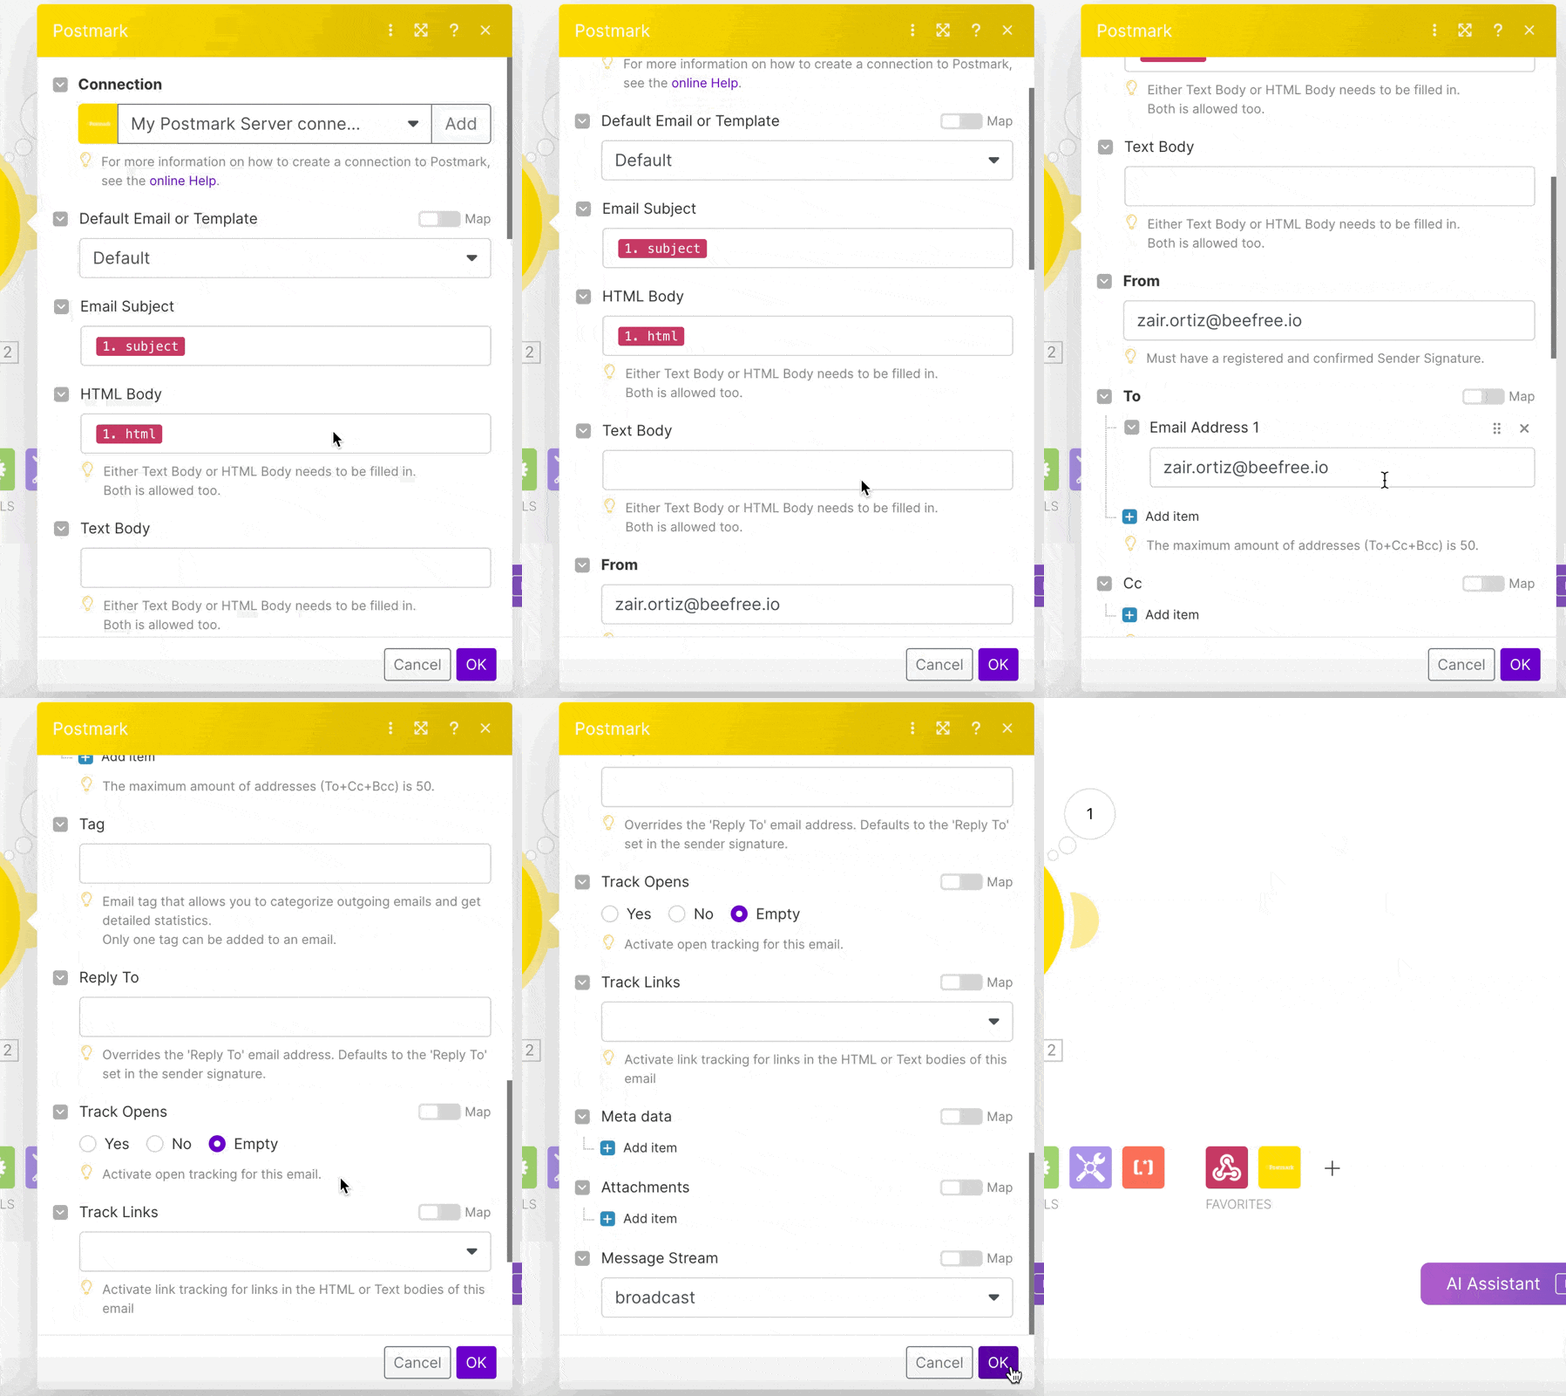
Export your design
Export your email design from RGE Studio:
- Navigate to your email's details within RGE Studio
- Select Export
- Select Integrations
- Click Custom connector
- Click Create to confirm
This is one example of how you can use a Custom connector. You can adapt this workflow to other platforms and use cases.
Important considerations
Consider the following when working with a Custom connector:
- Headers and values are optional.
- When choosing a platform, confirm it supports at least one of these actions:
- Send email
- Create a draft
- Create a template
- Create an email
- You can disconnect your Custom connector at any time. Click Disconnect on the Custom connector account.
If you have any questions, feel free to contact us.
Comments
0 comments
Please sign in to leave a comment.