Updating Asana tasks with webhooks and Zapier

Beefree App is now RGE Studio!
The email design suite you already know and love just leveled up. We’re working hard to update our help center, but you still may see some references to the old product name.
This article applies to the Enterprise plan.
Overview
Webhooks in RGE Studio send updates to other apps. They fire when someone comments on a design or changes its status. You can use them to keep a project management tool in sync with your designs. To learn how webhooks work, see Using Webhooks.
This article walks you through one example. It uses Zapier to catch webhooks from RGE Studio. Zapier then updates a task in Asana. You can follow similar steps for other project management apps that connect to Zapier.
You'll set up two webhooks in RGE Studio. Each one connects to its own Zap in Zapier:
- Comments webhook: posts comments from your design to the matching Asana task.
- Design status webhook: marks the Asana task complete when the design is approved.
Prerequisites
To follow this example, you need:
- An Owner, Admin, or Manager role in your RGE Studio workspace
- A paid Zapier plan. Webhooks by Zapier and Paths are only available on paid plans.
- An Asana account with access to the task you want to update
Link your design to Asana
First, connect your RGE Studio design to a task in Asana. You'll copy two IDs from the Asana task's URL. Then you'll add them to your design as tags in RGE Studio. The webhook includes these tags, so Zapier knows which task to update.
It's easiest to keep Asana and RGE Studio open side by side. That way, you can copy and paste one ID at a time.
- In Asana, open or create a task.
- In RGE Studio, open the details page for your email or page. To learn more, see Using the Email Details Section.
- In Asana, look at the task's URL in your browser. Copy the number after
/task/. This is the Task ID. - In RGE Studio, add this tag to your design:
taskid=[TASK_ID] - Replace
[TASK_ID], including the brackets, with the Task ID you copied. - In Asana, copy the number after
/project/in the same URL. This is the Project ID. - In RGE Studio, add this tag:
projectid=[PROJECT_ID] - Replace
[PROJECT_ID], including the brackets, with the Project ID you copied. - Save your changes.
For example, say your Asana task URL looks like this:
https://app.asana.com/1/1151068000000000/project/1220531000000000/task/1220528000000000
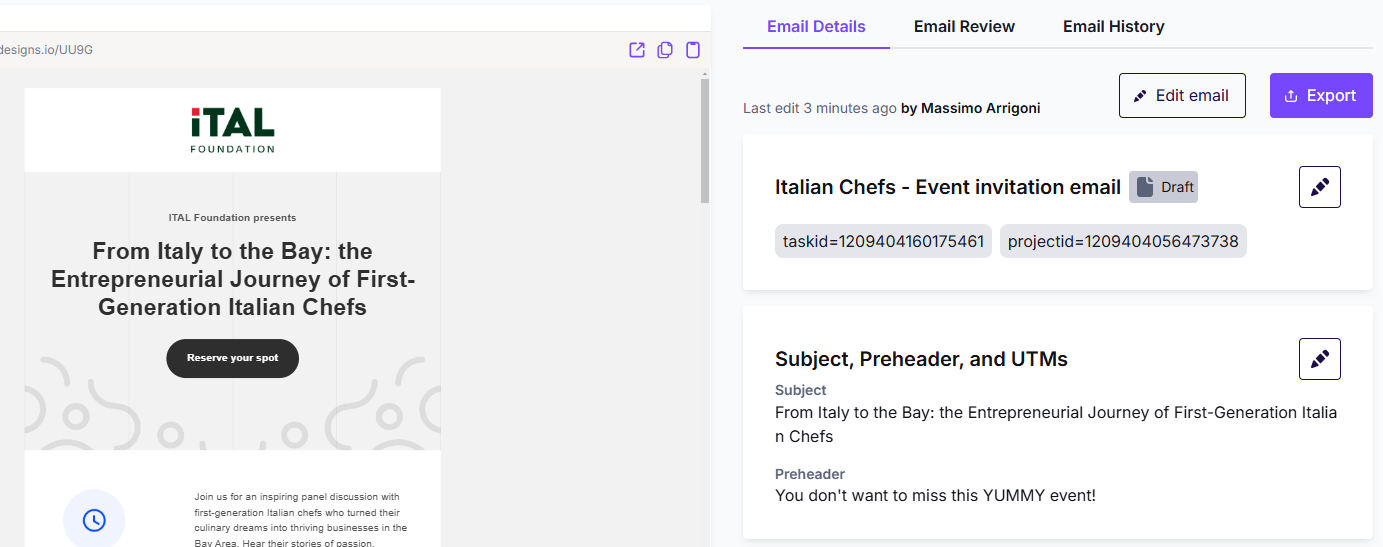
Your two tags in RGE Studio would be:
taskid=1220528000000000
projectid=1220531000000000
Your tags appear below the design name. You can add the same tags to more than one design.
Send comments to Asana
Next, set up a Comments webhook in RGE Studio. Each time someone comments on a design, the webhook sends the comment to Zapier. A Zap then posts it to your Asana task. To learn more about adding webhooks, see Using Webhooks.
A Zap is an automated workflow in Zapier. This Zap has three steps:
- A trigger that catches the RGE Studio webhook
- A code step that finds the Task ID and Project ID
- An Asana action that posts the comment
Create the webhook
The RGE Studio webhook needs a URL to send its data to. You'll get that URL from Zapier first.
- In Zapier, create a new Zap.
- Add Webhooks by Zapier as the trigger.
- Set the trigger event to Catch Hook.
- Leave Pick off a Child Key empty.
- Copy the Webhook URL.
- In RGE Studio, go to Settings. Open the Webhooks tab.
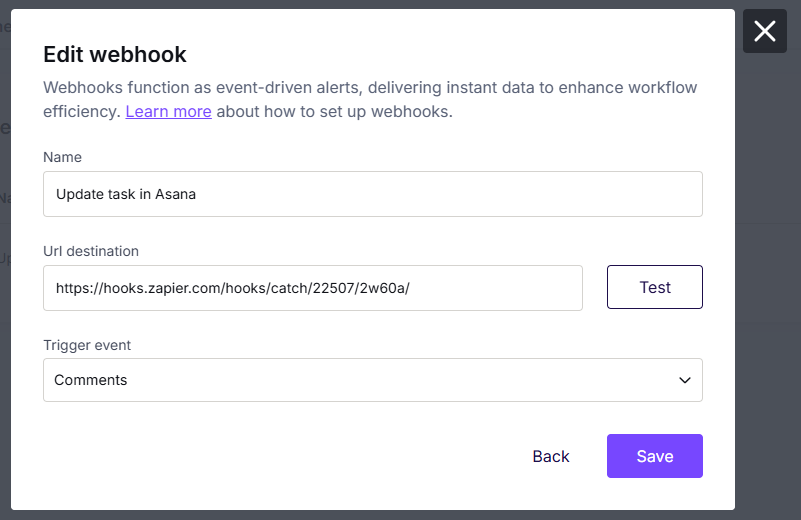
- Add a webhook. Give it a name that describes what it does.
- Paste the Zapier webhook URL.
- For Trigger event, select Comments.
- Click Save.
Your webhook should look similar to this:
Zapier needs a sample event to finish the setup. You can send one by leaving a comment. Use the design you tagged, so the sample includes your tags.
- In RGE Studio, open the design you tagged in the builder.
- Leave a comment.
- Go back to Zapier. Click Find new records.
- Select the comment event. Then click Continue.
Extract the IDs
The webhook sends its data in a payload. The payload includes details about the comment and the design. It also includes the design's tags. A code step in Zapier pulls the Task ID and Project ID out of those tags.
- Add a Code by Zapier step.
- Set the action event to Run Javascript.
- Under Input Data, enter
tagsas the key. - For the value, select Tags from the webhook data.
-
In the Code field, paste this code:
// Split the tags into a list and remove extra spaces const tags = (inputData.tags || '').split(',').map(tag => tag.trim()); // Find the tags that hold the task and project IDs const taskIdTag = tags.find(tag => tag.startsWith('taskid=')); const projectIdTag = tags.find(tag => tag.startsWith('projectid=')); // Keep only the number after the equals sign const taskId = taskIdTag ? taskIdTag.split('=')[1] : null; const projectId = projectIdTag ? projectIdTag.split('=')[1] : null; return { taskId, projectId }; - Click Continue.
This webhook fires for comments on every design in the workspace. If a design doesn't have both tags, the Zap stops with an error. To prevent this, add a Filter step after the code step. Set it to continue only if Task ID exists.
Post the comment
Now use the IDs to post the comment on the right Asana task.
- Add an Asana action step.
- Set the action event to Create Comment/Story.
- Select your Workspace.
- In the Project field, switch to a custom value. Select Project ID from the code step.
- In the Task field, switch to a custom value. Select Task ID from the code step.
- In the Text field, add the webhook data you want to post. For example, add the user name, design name, and comment.
- Test the step. The comment should appear on your Asana task.
- Publish the Zap.
The Zap now runs each time someone comments on a tagged design.
Complete tasks on approval
Your second webhook in RGE Studio uses Design status as its trigger event. It fires each time a design's status changes. A second Zap checks the new status. If the design is approved, the Zap marks the Asana task complete. For any other status, it only posts a comment.
Start the same way you set up the Comments webhook:
- In Zapier, create a new Zap. Copy its webhook URL. Follow the steps in Create the webhook.
- In RGE Studio, add a new webhook. For Trigger event, select Design status.
- Change your tagged design's status to Approved. This sends a sample event to Zapier.
- In Zapier, find and select the event.
- Add the code step from Extract the IDs.
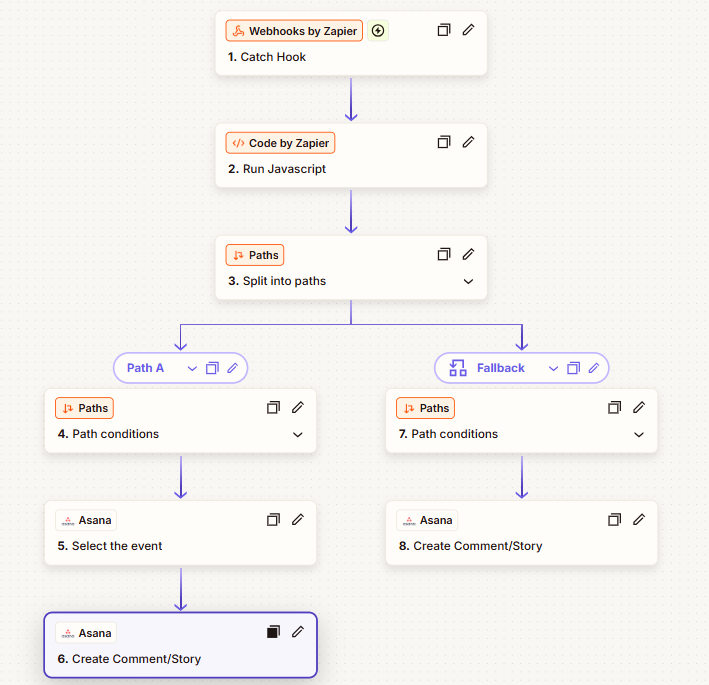
Next, add a Paths step in Zapier. Paths lets the Zap do different things based on the design's status.
- Add a Paths step after the code step.
- Open Path A. Select Custom rules.
- Set the rule to Only continue if Status Name contains
approved. - In Path A, add an Asana step with the Update Task action.
- Map the Project and Task fields the same way as before.
- Set Mark Task as complete to true.
- Leave the description field blank. Any text there replaces the task's current description.
- To post a comment too, add a Create Comment/Story step to Path A. For example: "This design was approved in RGE Studio."
- Open Path B. Select Fallback. This path runs for every other status.
- In Path B, add a Create Comment/Story step. It posts a comment without changing the task.
- Test each path. Then publish the Zap.
Your Zap should look similar to this:
If you have any questions, feel free to contact us.
Comments
0 comments
Please sign in to leave a comment.